What does an Azure DevOps migration checklist cover?
An Azure DevOps migration checklist helps teams complete the activities required to move projects and related assets accurately. The checklist covers:
- Migration goals and scope
- Projects, work items and repositories
- Pipelines and test assets
- Users, permissions and security groups
- Customizations and integrations
- Data quality and backup
- Field and identity mappings
- Migration execution and monitoring
- Data validation and traceability
- User acceptance testing
- Legacy environment retirement
A structured checklist reduces missed dependencies, keeps responsibilities clear and provides evidence that each migration activity has been completed.
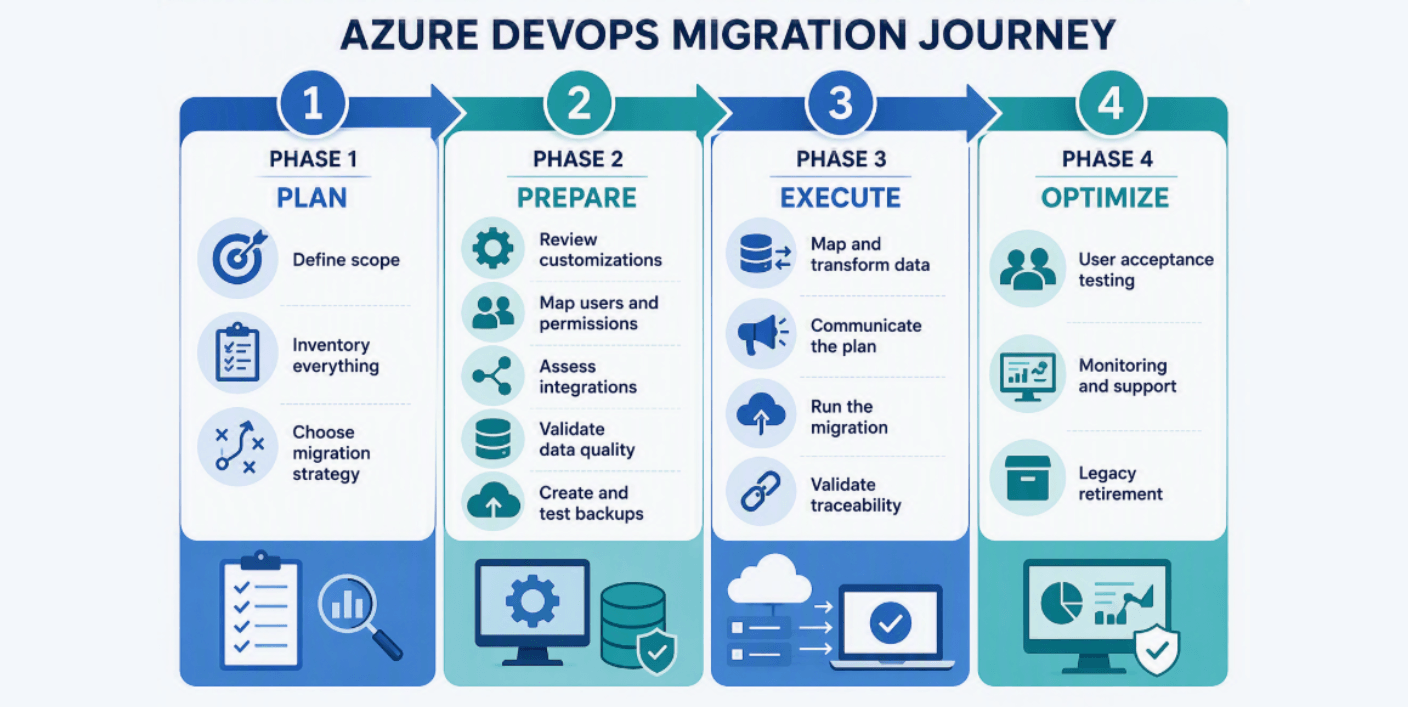
The four phases of Azure DevOps migration
Phase 1: Plan your Azure DevOps migration
Planning establishes the migration scope, requirements and approach. Complete these steps before preparing the environments.
Step 1: Define the purpose and scope of the migration
Start by documenting why the migration is required and what the migration must achieve.
Consider questions such as:
- Are you moving from Team Foundation Server or Azure DevOps Server to Azure DevOps Services?
- Are you consolidating projects or organizations?
- Are you moving between existing Azure DevOps environments?
- Are you retiring legacy infrastructure?
- Are you standardizing processes across teams?
Define the migration scope clearly. Document:
- Projects to migrate
- Data to migrate
- Data to archive
- Source and target environments
- Users and teams affected
- Required integrations
- Expected downtime
- Compliance and retention requirements
Create measurable success criteria before migration begins. Examples include successful migration of all approved projects, preservation of work item history, availability of repositories and successful access validation.
Step 2: Inventory the Azure DevOps environment
Create a complete inventory of the source environment. This inventory provides the basis for migration planning, effort estimation and validation.
Record the following items:
The inventory should identify the quantity, owner, business purpose and migration priority of each asset.
Step 3: Decide what should and should not be migrated
Migration is the right time to remove data that no longer serves a business purpose.
Review each project and classify it as:
- Migrate
- Archive
- Retain as read-only
- Exclude
Consider archiving:
- Obsolete projects
- Duplicate repositories
- Completed initiatives
- Inactive user accounts
- Outdated dashboards
- Legacy queries
- Unused pipeline configurations
Keep a record of excluded and archived items. The record helps users find information after migration and supports future audit requirements.
Step 4: Review migration requirements, dependencies and constraints
Document the technical and business requirements that affect the migration.
Review:
- Source and target Azure DevOps versions
- Project and organization structure
- Required customizations
- Identity and permission requirements
- Integration dependencies
- Compliance requirements
- Data retention rules
- Available migration window
- Rollback and recovery requirements
- Validation responsibilities
This step connects the migration goal with the activities required to complete it.
Step 5: Choose the migration strategy
Select the migration approach according to the source environment, target environment, project structure and acceptable downtime.
Select the migration approach according to the source environment, target environment, project structure and acceptable downtime.
Phase 2: Prepare for the migration
Preparation confirms that the source and target environments, data and dependencies are ready for migration.
Step 6: Prepare the source and target environments
Confirm that both environments are accessible and configured correctly.
Review:
- Required user access
- Project permissions
- Service accounts
- Network connectivity
- Storage and capacity
- Azure DevOps versions
- Organization and project structure
- Target naming standards
- Required extensions
- Authentication settings
The target environment should have the required configuration before migration data is loaded.
Step 7: Review customizations, workflows and process configurations
Azure DevOps projects commonly contain custom work item types, fields, workflows and rules. Document these configurations before migration.
Review:
- Custom work item types
- Custom fields
- Process templates
- Inherited processes
- State transitions
- Workflow rules
- Required field mappings
- Validation rules
- Extensions
- Business rules
Create a mapping document that explains how each source configuration maps to the target environment.
How OM4ADO helps
OM4ADO provides configurable field mapping and transformation capabilities. These capabilities help map source fields, work item types and relationships to the target Azure DevOps environment.
Step 8: Validate user identities, permissions and security groups
Users need correct access and ownership after migration. Create a user mapping plan before moving data.
Review:
- Active users
- Inactive users
- Microsoft Entra ID identities
- Service accounts
- Project administrators
- Build administrators
- Security groups
- Stakeholder access
Validate:
- Identity mapping
- Project membership
- Access levels
- Ownership
- Group permissions
- Notification recipients
A complete mapping prevents missing ownership, permission failures and incorrect notifications after migration.
How OM4ADO helps
OM4ADO supports user mapping for migration scenarios. The mapping can be imported or exported in supported migration configurations.
Step 9: Assess integrations and external dependencies
Document every system connected to Azure DevOps.
Review integrations with:
- Jira
- GitHub
- Jenkins
- ServiceNow
- SonarQube
- Microsoft Teams
- Test management platforms
- Requirements management platforms
For every integration, record:
- Purpose
- Authentication method
- API endpoints
- Owner
- Data exchanged
- Required configuration changes
- Validation method
Plan whether each integration will continue, be replaced or be retired.
Step 10: Improve data quality before migration
Review source data and resolve issues before migration.
Check for:
- Duplicate work items
- Broken links
- Missing attachments
- Invalid user references
- Obsolete custom fields
- Empty projects
- Inactive records
- Incorrect states
- Incomplete relationships
Cleaning data reduces validation effort and improves the quality of the target environment.
Step 11: Create and verify the backup and recovery plan
Create a backup of all data required for recovery and validation.
Depending on the environment, include:
- Work items
- Repositories
- TFVC changesets
- Attachments
- Wiki content
- Dashboards
- Queries
- Pipeline configurations
- Configuration files
- Relevant databases
Verify that the backup can be restored or accessed according to the recovery plan. Define the recovery owner and recovery steps before the production migration.
Step 12: Perform a pilot migration
Run a pilot migration with a representative project before production.
Choose a project containing the work item types, repositories, tests, pipelines and customizations included in the production scope.
Use the pilot to:
- Validate field mappings
- Test user mappings
- Check customizations
- Measure migration duration
- Review migration reports
- Identify errors
- Confirm validation procedures
- Refine the cutover plan
How OM4ADO helps
OM4ADO supports trial migrations, migration reports and failure management. These features help teams test the approach and correct mapping issues before production execution.
Step 13: Confirm migration readiness
Complete a formal readiness review.
Confirm that:
- Source and target environments are ready
- Customizations are mapped
- Users and permissions are mapped
- Integrations are documented
- Data quality issues are resolved
- Backup is verified
- Pilot results are approved
- Migration and cutover plans are approved
- Validation owners are assigned
Phase 3: Execute the migration
Execution moves the approved data according to the selected strategy and approved plan.
Step 14: Finalize field, relationship and identity mappings
Complete the final mapping review before production migration.
Verify mappings for:
- Work item types
- Custom fields
- Users
- States
- Iterations
- Area paths
- Tags
- Links
- Relationships
- Repositories
- Test assets
- Pipeline configurations
Confirm how conflicts, missing values and unsupported configurations will be handled.
How OM4ADO helps
OM4ADO provides configurable field, relationship and transformation mappings. These capabilities allow source data to be positioned correctly in the target environment while preserving relevant context.
Step 15: Communicate the migration and cutover plan
Inform all affected users before migration begins.
Share:
- Migration date and time
- Maintenance window
- Expected restrictions
- Systems affected
- User actions required
- Validation period
- Support contacts
- Cutover completion notice
A clear communication plan prevents users from making untracked changes during migration.
Step 16: Freeze or manage source-system changes as required
Decide how changes will be handled while migration is running.
The plan should define:
- Whether users can create or update work items
- Whether code commits are restricted
- Whether pipelines remain active
- How changes are captured
- How late changes are synchronized
- Who approves reopening the source environment
The selected approach should match the migration strategy and synchronization capabilities.
Step 17: Execute the migration
Run the production migration according to the approved sequence.
During execution:
- Monitor migration progress
- Review logs
- Check system performance
- Track network connectivity
- Record failed items
- Resolve blocking issues
- Maintain migration records
- Follow the rollback plan when required
For migrations performed in phases, validate each group before moving to the next group.
Step 18: Monitor migration progress, errors and synchronization status
Use migration reports and logs to track the migration.
Monitor:
- Completed projects
- Successful records
- Failed records
- Retry status
- Relationship errors
- Attachment errors
- User mapping errors
- Synchronization status
- System performance
- Record each issue, its resolution and the person responsible for closure
Phase 4: Validate, stabilize and close the migration
Validation confirms that the destination environment is usable and that migrated information remains complete and connected.
Step 19: Validate migrated data
Validation answers one specific question: Did the required data arrive correctly
Compare the source and target environments and validate:
Combine automated comparison with manual checks of representative records.
Step 20: Verify end-to-end traceability
Traceability answers a different question: Are the relationships between migrated records still intact?
Verify links between:
- Requirements and user stories
- User stories and development tasks
- Tasks and source code
- Bugs and test cases
- Test cases and releases
Preserved relationships support impact analysis, reporting, audits and day-to-day development work.
How OM4ADO helps
OM4ADO helps preserve work item relationships, history, comments and attachments during supported migrations
Step 21: Complete user acceptance testing
Ask representatives from affected teams to test the new environment.
Test:
- Creating and updating work items
- Running saved queries
- Viewing dashboards
- Executing test plans
- Triggering pipelines
- Accessing repositories
- Reviewing permissions
- Using notifications
Record feedback and resolve issues before closing the migration.
Step 22: Validate integrations and automations
Confirm that connected systems and automated processes work correctly.
Test:
- Service connections
- Webhooks
- API integrations
- Automation rules
- Pipeline triggers
- Repository connections
- IT service management integrations
- Reporting integrations
Verify authentication, permissions and data exchange for every integration.
Step 23: Monitor post-go-live behavior
Monitor the new environment after users start working in it.
Track:
- Performance issues
- Permission errors
- Pipeline failures
- Synchronization issues
- Missing data
- Integration failures
- User-reported problems
Maintain a support process with clear ownership, priority and resolution tracking.
Step 24: Retire the legacy environment
Retire the source environment after validation and acceptance are complete.
Before retirement:
- Confirm that all approved data was migrated
- Verify compliance and audit requirements
- Retain backups
- Confirm the retention period
- Notify users
- Disable unauthorized access
- Follow the approved decommissioning schedule
Read-only access can be retained for a defined period when required by policy.
Step 25: Capture lessons learned and complete migration closure
Conduct a formal review of the migration.
Document:
- Successful activities
- Issues encountered
- Root causes
- Resolutions
- Migration duration
- Validation findings
- Support tickets
- Process improvements
Store the final inventory, mapping documents, reports, approvals and lessons learned in an accessible location.
Common Azure DevOps migration mistakes to avoid
How OM4ADO simplifies Azure DevOps migration?
OM4ADO supports the key activities involved in a planned Azure DevOps migration:
- Configurable mappings for fields and transformations
- User mapping for identities and ownership
- Trial migrations and migration reports
- Migration of work items, history, comments, attachments and relationships
- Supported migration of TFVC changesets and Git repositories
- Migration support for selected test assets, pipelines, dashboards and queries according to the selected edition and scenario
- Failure management and retry support
- Migration between supported Azure DevOps and Team Foundation Server environments
- Migration with continuous synchronization when the selected scenario and configuration support it.
The right migration approach depends on the source and target environments, the required data, the selected product edition and the approved migration plan. Confirm the supported entities and capabilities before starting production migration.
Conclusion
A successful Azure DevOps migration starts with clear planning and continues through preparation, execution, validation and stabilization.
Following a 25-step sequence helps teams move in one direction:
- Plan the migration.
- Prepare the environments and data.
- Execute the move according to the approved strategy.
- Validate the results, stabilize the new environment and close the migration.
With accurate inventory, tested mappings, verified backups, a pilot migration and structured validation, organizations can preserve important engineering information and reduce disruption during the transition. OM4ADO supports these activities with mapping, migration, reporting and validation capabilities that help teams complete their Azure DevOps migration with greater control.